
Getting the Most from a Residential Solar System
Installing solar panels on the roof of your home is the best way to reduce (or even eliminate) your monthly electricity bill and make a positive impact on the environment. But regardless of whether you’re going solar because you’re looking to save money on your bills or help protect the environment, one of the things that you want to do is to prepare your home for your solar panel installation.
Preparing for your solar installation will help make the entire process of having your solar panels installed go easier and smoother. So, here’s a helpful guide that will help ensure that by taking a few basic steps you can prepare your home for its transition to renewable energy.
Step 1: Determine Your Solar Energy Needs
One of the first things you need to do to prepare for your solar installation is to determine how much of your electricity use you want to be provided by your solar panels. This is important because if you want 100% of your energy to come from your solar system, then you will need to factor in solar battery storage, so you can access electricity during the evenings. This will increase your costs and require space to be dedicated for keeping the batteries.
Many homeowners who don’t want the added cost of batteries might choose to have solar systems installed that will provide up to 100% of the daytime energy use to then rely on grid energy for the evening. This will dramatically reduce their monthly utility bill, but it won’t eliminate it. They may also be able to bank solar credits with their local electric company that can be used to help offset the cost of their grid energy during summer’s peak operating months.
To determine how many solar panels you need, you should grab your electric bill and take a look at how many kilowatt-hours (kWh) you use in a month or a full year. Once you have that information, call a reputable solar installer for a quote. The solar installer will take a look at your property and then provide you with a system size and cost estimate.
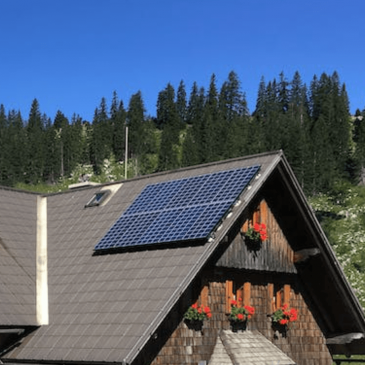
Step 2: Determine Your Solar Panel Location
For your solar panels to operate at their most efficient, they will need to be installed on a part of your property where they can receive the most sunshine. In most cases, this will be on the roof of a home, but it isn’t always the case.
For instance, many homes have trees nearby for the purpose of shading the home during the heat of summer. In this case, if you still want a rooftop installation, then the trees would either need to be pruned back or removed. Or, if you want to keep the shade but you have a large area of your yard where the sun hits all day long, then choosing a ground-installed solar array can provide you with the best of both worlds.
If you aren’t sure where you will get the best performance out of your solar panels, don’t worry. When your solar installer visits your property for their initial consultation, they will help you identify the best location for your solar panels.
Step 3: Prepare for the Paperwork
Any time you’re having a major renovation or addition made to your home, you will need to receive certain regulatory approvals from your local township before physical work can start on the project, and this includes solar installations. In fact, in most communities, you need to meet the requirements of your local building department and gain approval from your utility provider.
The process of completing and submitting permits and pre-installation paperwork can be involved and time consuming. The paperwork will usually require you to include a list of the specifications for your equipment, a copy of the system’s electrical design, and a building plan. The good thing is that your solar installer will be able to help you through this process and provide you with the information you need.
Another thing you will want to look into is if your state permits net metering. With net metering, your utility company will compensate you for any excess electricity that your system uploads back to the grid. If your state supports net metering and your solar system produces more energy than you use, then you will be compensated for your unused electricity via a solar credit. As you bank solar credits, they can be used to pay for electricity that you draw from the grid, such as at night when your solar system isn’t generating energy.
Step 4: Have Your Roof Inspected to Make Sure It’s Ready for the Extra Weight
If your solar panels are being installed on the roof of your home, then you need to know if your roof is capable of handling the extra weight. Solar panels weigh roughly 2.7 pounds per square feet, and most modern roofs are capable of supporting that. But regardless, you still need to know for sure. So, you will want to hire a third-party structural engineer or building inspector to inspect your roof to make sure it can safely support the weight of your new solar system.
Step 5: Look Into Available Solar Incentives
Federal, state, and local solar incentives can help you save a lot of money on the cost of your solar installation. But to take advantage of them, you need to know about them.
The largest incentive is the federal solar tax credit, which is set at 30% of the cost of your solar system. This tax credit reduces the amount you own on your taxes by that amount. It’s available to all residential solar owners so long as they own or finance-to-own their solar systems and pay their taxes.
There may even be incentives available to you on a state, utility, or local level, but these might be harder for you to find. Your solar installer should be able to provide you with more information about what’s available in your area. Or, you can run your solar proposal by your accountant before signing it because they can help ensure you are taking advantage of all the financial benefits that might be available to you.
Step 6: Prepare Your Property for Your Solar Installation
Most solar installations are fairly simple and straightforward, so once your contractors are on site there won’t be much for you to do. But one thing that can help make everything progress even smoother is to make sure the area where your solar installer’s crew will be working in is clear and easily accessible, as well as the area around where your electric panel and utility meter are located.
Likewise, if you are having battery storage installed, then the area where your inverter and battery systems are being installed should be clean and ready for installation.
Preparing your home for solar and handling all the paperwork as early as possible is essential for enjoying a smooth and seamless solar installation. By taking care of the above issues, you’ll help ensure that your installers can arrive at your home and get right to work installing your new solar panels.
Most residential solar systems can be installed in 2-5 days depending on the size and complexity.